안녕하세요
오늘은 제가 강의를 보며 배웠던걸 정리하고자 합니다
앨런 iOS 앱 개발 (15개의 앱을 만들면서 근본원리부터 배우는 UIKit) - MVVM까지 | 앨런(Allen) - 인프런
앨런(Allen) | 탄탄한 신입 iOS개발자가 되기 위한 기본기 갖추기. 15개의 앱을 만들어 보면서 익히는.. iOS프로그래밍의 기초, 15개의 앱을 만들면서 배우는 UIKit!근본부터 다른 강의, 들어보실래요?
www.inflearn.com
를 통해서 정리하였습니다
정말 정말 잘 설명해주기 때문에 제가 정리해놓은것 보다 보시는걸 추천드립니다

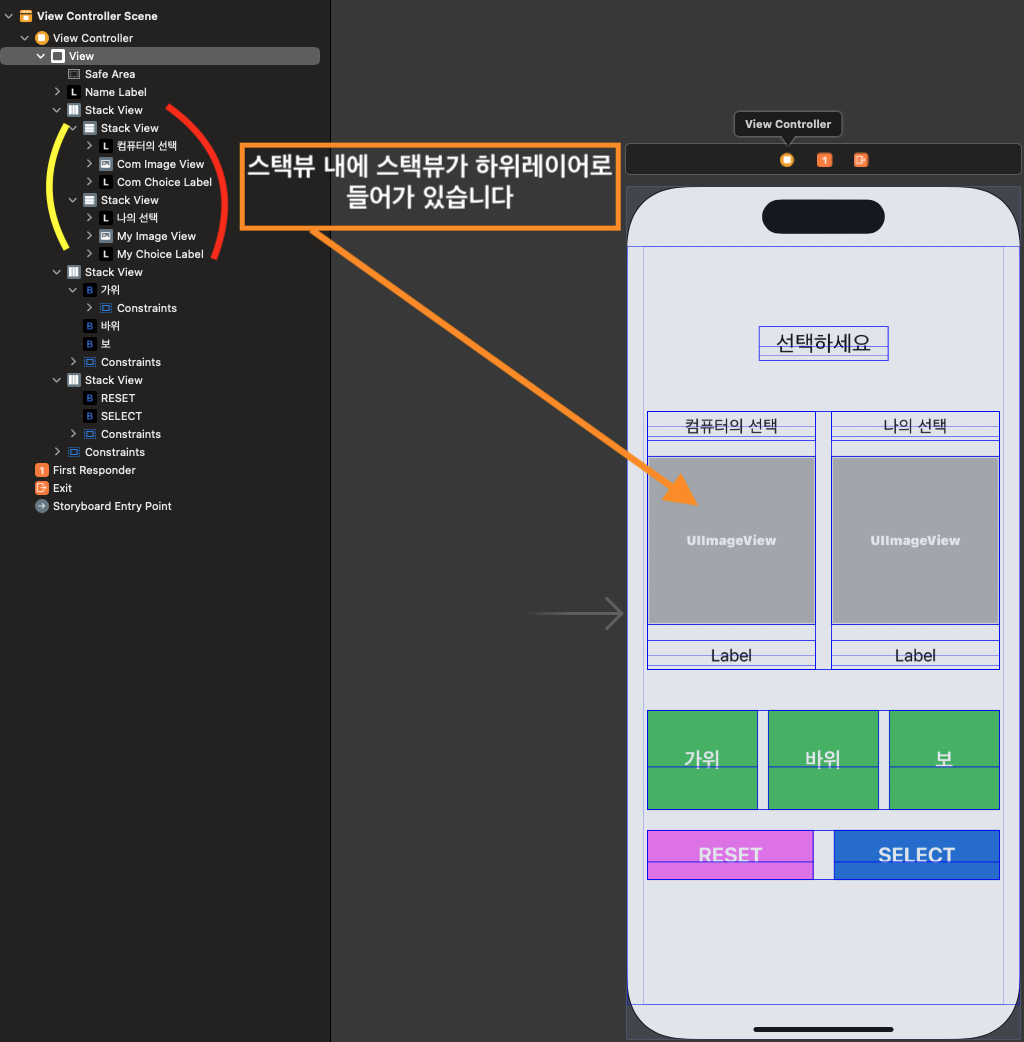
스택뷰안에 스택뷰가 들어가기 때문에 쉽게 관리가 가능하고 깔끔하게 레이어가 정리되어있는걸 볼 수 있습니다

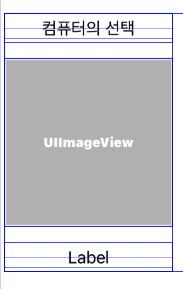
우선 이렇게 오브젝트를 나열한 후
세 오브젝트를 드래그 하여 스택뷰로 잡아줍니다
그리곤 option을 선택한 후 스택뷰를 하나 더 만들어준 후
스택뷰를 하나 만들어 준 후

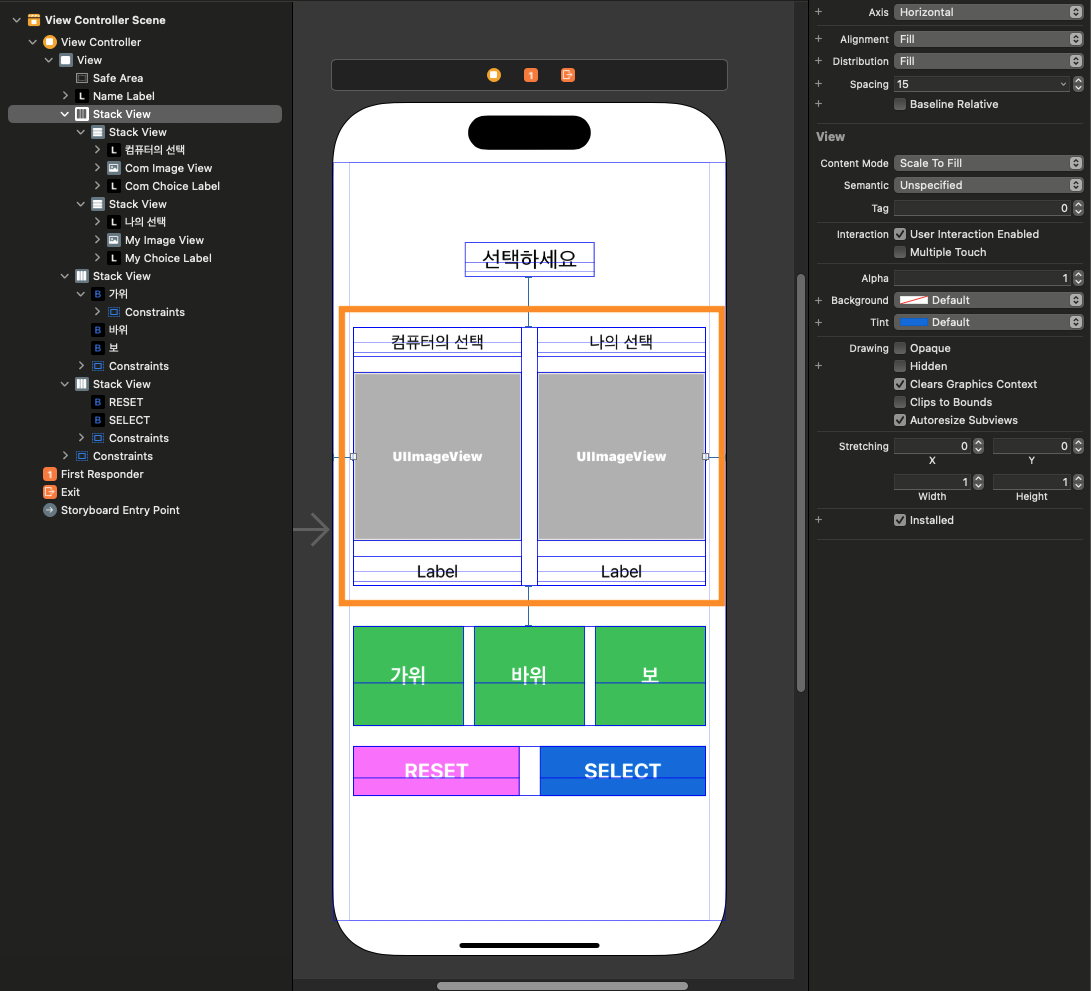
주황색 섹션의 두 객체의 스택뷰를 클릭한 후 스택뷰를 지정해줍니다
그럼 스택뷰 안에 스택뷰가 있는것을 볼 수 있습니다

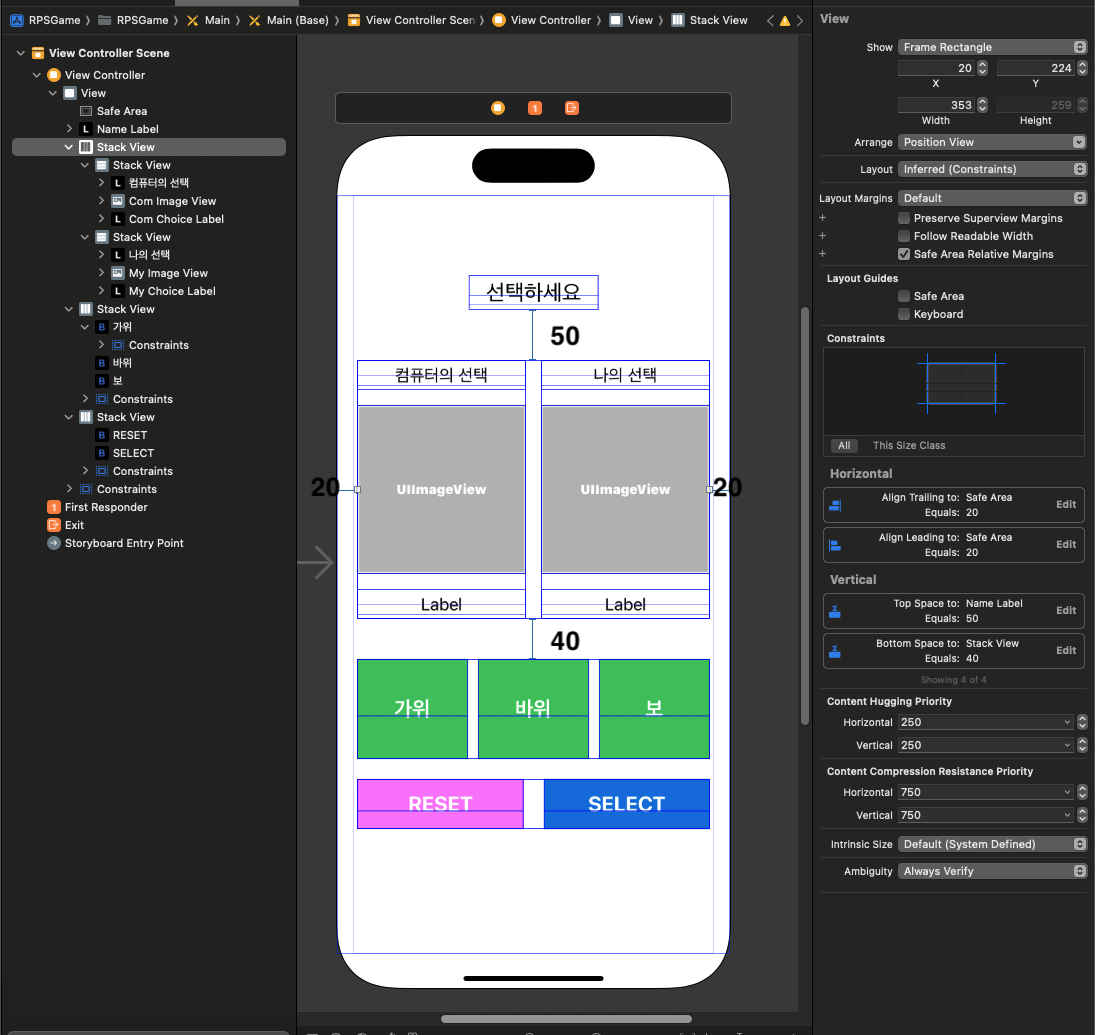
상하좌우에 대한 간격에 제약을 줍니다

그리곤 아래에 리셋과 셀렉버튼도 동일하게 설정하면 됩니다
그리곤 코드와 스토리보드를 연동하면 됩니다
import UIKit

class ViewController: UIViewController {

    //변수 / 속성 (프로퍼티) 클래스 내부에서
    @IBOutlet weak var nameLabel: UILabel!

    @IBOutlet weak var comImageView: UIImageView!
    @IBOutlet weak var myImageView: UIImageView!


    @IBOutlet weak var comChoiceLabel: UILabel!
    @IBOutlet weak var myChoiceLabel: UILabel!


    var myChoice: Rps = Rps.rock
    var comChoice: Rps = Rps(rawValue: Int.random(in: 0...2))!

    //앱의 화면에 들어오면 처음 실행되는 함수
    override func viewDidLoad() {
        super.viewDidLoad()
        // Do any additional setup after loading the view.

        comImageView.image = UIImage(named: "ready.png")
        myImageView.image = #imageLiteral(resourceName: "ready")

        comChoiceLabel.text = "준비"
        myChoiceLabel.text = "준비"

    }


    //가위,바위,보 버튼 클릭시 실행 - 하나의 함수로 버튼 세개가 연결됨
    @IBAction func rpsButtonTapped(_ sender: UIButton) {
        //가위바위보를 선택해서 그 정보를 나의선택에 정보를 저장


        //        if let title1 = sender.currentTitle {
        //
        //        }

        guard let title = sender.currentTitle else { return }


        switch title {
        case "가위":
            myChoice = Rps.scissors
        case "바위":
            myChoice = Rps.rock
        case "보":
            myChoice = Rps.paper
        default:
            break
        }
    }


    @IBAction func selectButtonTapped(_ sender: UIButton) {
        //컴퓨터가 랜덤으로 선택한 이미지를 이미지뷰에 표시
        switch comChoice{
        case Rps.rock:
            comImageView.image = #imageLiteral(resourceName: "rock")
            comChoiceLabel.text = "바위"
        case Rps.paper:
            comImageView.image = #imageLiteral(resourceName: "paper")
            comChoiceLabel.text = "보"
        case Rps.scissors:
            comImageView.image = #imageLiteral(resourceName: "scissors")
            comChoiceLabel.text = "가위"
        }

        switch myChoice {
        case .rock:
            myImageView.image = #imageLiteral(resourceName: "rock")
            myChoiceLabel.text = "바위"
        case .paper:
            myImageView.image = #imageLiteral(resourceName: "paper")
            myChoiceLabel.text = "보"
        case .scissors:
            myImageView.image = #imageLiteral(resourceName: "scissors")
            myChoiceLabel.text = "가위"
        }


        if comChoice == myChoice {
            nameLabel.text = "비김"
        } else if comChoice == .rock && myChoice == .paper {
            nameLabel.text = "이겼다"
        } else if comChoice == .paper && myChoice == .scissors {
            nameLabel.text = "이겼다"
        } else if comChoice == .scissors && myChoice == .rock {
            nameLabel.text = "이겼다"
        } else {
            nameLabel.text = "졌다"
        }

    }


    @IBAction func resetButtonTapped(_ sender: UIButton) {

        comImageView.image = UIImage(named: "ready.png")
        myImageView.image = #imageLiteral(resourceName: "ready")

        comChoiceLabel.text = "준비"
        myChoiceLabel.text = "준비"

        nameLabel.text = "선택하세요"

        comChoice = Rps(rawValue: Int.random(in: 0...2))!
    }

}
이렇게 작성하기 보다
enum으로 메서드를 하나 만들고
reset 함수를 따로 하나 두고 만들것 같지만
지금 초반이라서 이렇게 코드를 짠것 같습니다
:)
그래서 함수로 묶어보았습니다
import UIKit

class ViewController: UIViewController {

    //변수 / 속성 (프로퍼티) 클래스 내부에서
    @IBOutlet weak var nameLabel: UILabel!

    @IBOutlet weak var comImageView: UIImageView!
    @IBOutlet weak var myImageView: UIImageView!


    @IBOutlet weak var comChoiceLabel: UILabel!
    @IBOutlet weak var myChoiceLabel: UILabel!


    var myChoice: Rps = Rps.rock
    var comChoice: Rps = Rps(rawValue: Int.random(in: 0...2))!

    //앱의 화면에 들어오면 처음 실행되는 함수
    override func viewDidLoad() {
        super.viewDidLoad()
        // Do any additional setup after loading the view.

        resetView()

    }


    //가위,바위,보 버튼 클릭시 실행 - 하나의 함수로 버튼 세개가 연결됨
    @IBAction func rpsButtonTapped(_ sender: UIButton) {
        //가위바위보를 선택해서 그 정보를 나의선택에 정보를 저장


        //        if let title1 = sender.currentTitle {
        //
        //        }

        guard let title = sender.currentTitle else { return }


        switch title {
        case "가위":
            myChoice = Rps.scissors
        case "바위":
            myChoice = Rps.rock
        case "보":
            myChoice = Rps.paper
        default:
            break
        }
    }


    @IBAction func selectButtonTapped(_ sender: UIButton) {
        //컴퓨터가 랜덤으로 선택한 이미지를 이미지뷰에 표시
//        switch comChoice{
//        case Rps.rock:
//            comImageView.image = #imageLiteral(resourceName: "rock")
//            comChoiceLabel.text = "바위"
//        case Rps.paper:
//            comImageView.image = #imageLiteral(resourceName: "paper")
//            comChoiceLabel.text = "보"
//        case Rps.scissors:
//            comImageView.image = #imageLiteral(resourceName: "scissors")
//            comChoiceLabel.text = "가위"
//        }
//
//        switch myChoice {
//        case .rock:
//            myImageView.image = #imageLiteral(resourceName: "rock")
//            myChoiceLabel.text = "바위"
//        case .paper:
//            myImageView.image = #imageLiteral(resourceName: "paper")
//            myChoiceLabel.text = "보"
//        case .scissors:
//            myImageView.image = #imageLiteral(resourceName: "scissors")
//            myChoiceLabel.text = "가위"
//        }


        //컴퓨터나의 선택 업데이트 뷰
        updateChoiceView(for: comChoice, imageView: comImageView, label: comChoiceLabel)

        updateChoiceView(for: myChoice, imageView: myImageView, label: myChoiceLabel)


        if comChoice == myChoice {
            nameLabel.text = "비김"
        } else if comChoice == .rock && myChoice == .paper {
            nameLabel.text = "이겼다"
        } else if comChoice == .paper && myChoice == .scissors {
            nameLabel.text = "이겼다"
        } else if comChoice == .scissors && myChoice == .rock {
            nameLabel.text = "이겼다"
        } else {
            nameLabel.text = "졌다"
        }

    }


    @IBAction func resetButtonTapped(_ sender: UIButton) {

        resetView()
    }

    private func updateChoiceView(for choice: Rps, imageView: UIImageView, label: UILabel) {
        switch choice {
        case .rock :
            imageView.image = #imageLiteral(resourceName: "rock")
            label.text = "바위"
        case .paper :
            imageView.image = #imageLiteral(resourceName: "paper")
            label.text = "보"
        case .scissors :
            imageView.image = #imageLiteral(resourceName: "scissors")
            label.text = "가위"
        }
    }

    private func resetView() {
        comImageView.image = UIImage(named: "ready.png")
        myImageView.image = #imageLiteral(resourceName: "ready")

        comChoiceLabel.text = "준비"
        myChoiceLabel.text = "준비"

        nameLabel.text = "선택하세요"

        comChoice = Rps(rawValue: Int.random(in: 0...2))!
    }

}
실행한 결과
함수로 묶어서 사용하게되면 재활용성이 높아지게되어
좋답니다


만약 틀린 내용이 있다면 알려주시고
제가 정리해놓은것 보다 강의가 훨씬 자세히 알려주니 꼭 들어보세용!
🍎참고
앨런앱 만들기 강의 (추천)
'강의 > 앨런 Swift 앱 만들기' 카테고리의 다른 글
| 앨런 Swift 앱 만들기 UIKit | 업다운앱 만들기 (0) | 2024.06.03 |
|---|---|
| 앨런 Swift 앱 만들기 UIKit | 맥앱 만들기 (1) | 2024.06.03 |
| 앨런 Swift 앱 만들기 UIKit | 주사위앱 만들기 / 화면과 오토레이아웃 설정하기 (0) | 2024.06.02 |
| 앨런 Swift 앱 만들기 UIKit | iOS Atchitecture / Framework (1) | 2024.06.02 |
| 앨런 Swift 앱 만들기 UIKit | 오토레이아웃과 스토리보드와 코드 연결하기 (0) | 2024.06.02 |